iOS navigation controller and toolbar pane
On iOS devices, apps can display a navigation controller and a toolbar pane.
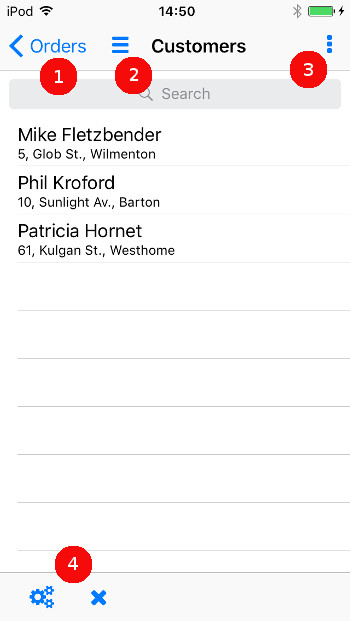
The iOS navigation controller is made of a navigation bar, an optional menu icon and a common action pane ( the current window/form title is displayed in the middle of these UI controls).
The iOS toolbar pane displays at the bottom of the screen to show application options.

- Navigation bar (1)
- The left side navigation bar provides a linear path through various screens. The
accept,cancelorcloseaction is rendered as the[<]back button, respectively in the order of precedence given here. If there is a previous form or window, then this button shows the title of the previous page. If there is not a form to return to, the "back" navigation button is not shown. - Menu icon (2)
- The three-bars icon is the menu icon. This icon appears
when the current form defines a
TOPMENU. The menu options are displayed in a listview, when the user taps on the menu icon. - Common action pane (3)
- The right-hand side is the common action pane. Default
action views are displayed here, in the same order as the
ON ACTIONblocks of the current dialog. - Toolbar pane (4)
- When default action views are displayed, if there is not enough room in the common action pane (3), the remaining actions are displayed in the toolbar pane at the bottom of the screen. If there is not enough space to display all action views in the toolbar pane, an overflow icon appears on the right. Tap on the overflow icon to show the remaining action views.
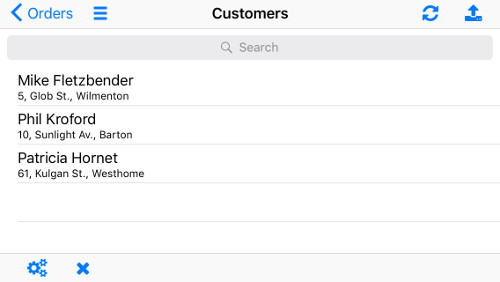
In the following screenshot, the iOS device is oriented in landscape mode. The app is the same, yet since there is enough space in the navigation bar, all default action views display in the common action pane.

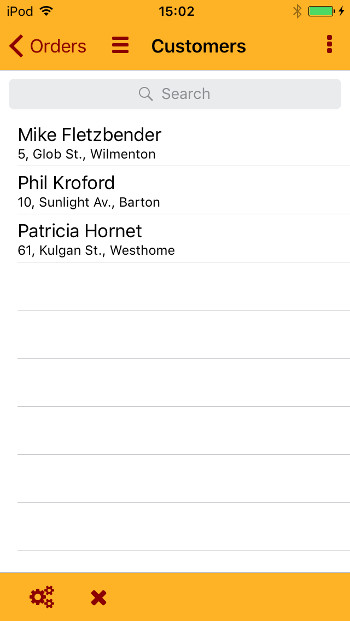
To customize the application, define the colors of the iOS navigation bar and toolbar
with the following Window-class style attributes:
iosTintColor, for items in (1), (2), (3) and (4) (and for other form items)iosNavigationBarTintColor, for (1), (2) and (3).iosToolBarTintColor, for (4).
For example, by setting the following style attributes, the navigation bar will render as
shown in the
screenshot:
<Style name="Window">
  <StyleAttribute name="iosTintColor"              value="darkRed" />
  <StyleAttribute name="iosNavigationBarTintColor" value="orange"  />
  <StyleAttribute name="iosToolBarTintColor"       value="orange"  />
  <StyleAttribute name="iosTabBarTintColor"        value="orange"  />
</Style>